How I Harvest Yeast for Future Brews
It seems that, at some point or another, a large number of home brewers end up with an interest in reusing their yeast. It makes sense; yeast can be one of the more expensive ingredients in any given recipe (liquid yeasts often run around $8 per vial/smack pack, give or take); ignoring this reusability will cost you money. And, let's not overlook the obvious advantages in flexibility that you get by having yeast already on hand.
One of the biggest hurdles to me getting involved in this aspect of homebrewing was the popular method of yeast harvesting that had been pushed for years - that method being yeast rinsing (commonly referred to online as "washing", though these are apparently not one and the same). I had googled various tutorials, and while the approaches had subtle differences, they all came back to the same basic steps - remove some portion of trub from the carboy, rinse that to hopefully yield more or less pure slurry, let it settle, make a complete WAG as to how much actual yeast that you had. It seemed like a lot of trouble, and I had a hard time buying into just how pure the yeast really was.
A little over a year ago, a free thinker from California started discussing an alternate, ridiculously simple method of yeast harvesting on the homebrewtalk forums. It caught some traction; he opened a blog of his own and posted his method there. He focused his blog on a similar theme - of looking at new methods, of examining old brewing preconceptions to see what was true and what was not. I can say without hyperbole that Brulosopher has revolutionized yeast harvesting, and done an incredible amount of good for home brewers in the previous year or so. If you have not yet read his initial post on yeast harvesting, by all means - go check it out now. I'll wait here until you return.
It took me longer than I care to admit to come around to adopting the mindset that harvesting yeast was more than just something that really advanced brewers would do. For better than a year, I simply treated a new package of yeast as a normal expense of brewing. Granted, I was smart enough to make starters - I had no desire to purchase 2-3 packages of yeast per brew to ensure that I could hit proper pitching rates - but I really didn't worry about it too much. What really tipped the scale for me was the desire to be able to brew with WLP037 (a platinum strain) outside of the season it was normally sold. Fortunately for me, my buddy vinpaysdoc was already ahead of me on harvesting yeast, and he was happy to share not only his yeast, but his knowledge.
These days, I harvest yeast every single time that I brew. I use the base Brulosophy method, tempered by my buddy's experiences, and seasoned a bit with my redneck heritage. I find this method so much better than yeast rinsing/washing for several reasons. The yeast is very pure (there are few byproducts from pure DME as opposed to the hopjunk and other crap you get from washing an actual beer's yeast cake), you get to store your yeast under "beer" (not water), and the process requires almost no extra effort. The following walks you through the typical yeast harvesting steps that I follow.
Before I do anything else, I first determine how many yeast cells I will need for my upcoming brew. Naturally, I use the yeast starter calculator here on this site for that, making sure to populate the "overbuild cell count" option with 100 billion cells (aka roughly the amount that comes in a typical vial or smack pack of commercial yeast). I always use a target gravity of 1.037 for my starters, which research has shown to be the "sweet spot" for yeast growth. Also, it doesn't hurt that the formula for such a starter is stupid simple - 100 grams of dry malt extract per liter of water yields a gravity of 1.037.
Incidentally, the scale that I use has proven to be very accurate and reliable for this - and it's quite affordable, too.
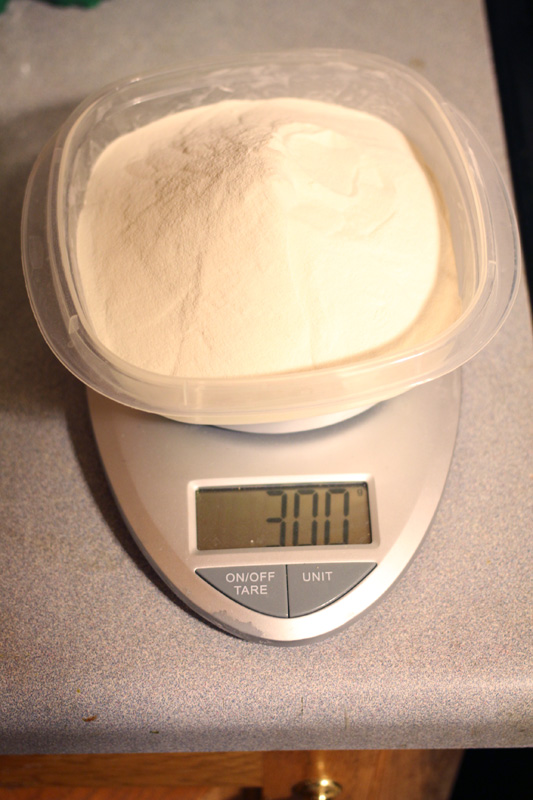
Pretty simple.
As an aside, I do use yeast nutrient in all of my starters. While this may not be strictly necessary, it's a good idea.
I almost always let my starters run for a good 2-3 days before I consider them to be complete. Realize that if your yeast is a little long in the tooth (say, it's been a few months since it's been used, or you have an older vial), you may need to give it an extra day to really get going. Some people prefer to pitch starters at high krausen, and have had great luck with that; more power to them. My method takes more lead time, but I feel that it makes yeast harvesting easier to do (which is the entire point of this post, yes?).
Note that not every yeast strain will make a large krausen (or any krausen at all) - but pretty much any strain will end up with a starter that looks cloudy due to the suspended yeast.
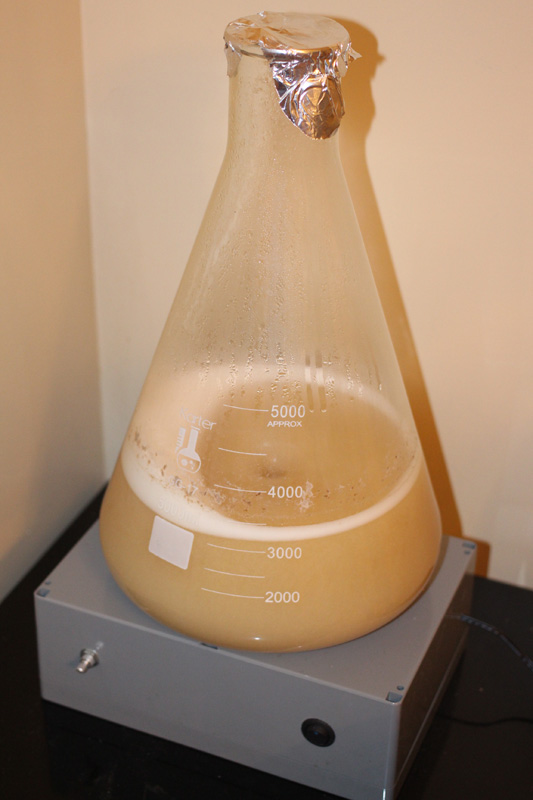
The krausen has fallen, the liquid is milky - this one is pretty much done.
At this point, I cold crash my starters for a minimum of 12 hours or so (for highly flocculent yeasts); ideally, it's more like 24-28 hours. Some really annoying strains (I'm looking at you, Conan) can cold crash for days and still not fully flocc out; keep this in mind. Regardless, the longer you cold crash, the more compact the yeast cake will be, and the easier it will be to decant without losing precious yeast.
I love my massive 5 liter erlenmeyer flask for making starters; neither high gravity beers nor lagers give me any trouble in terms of starter volume... but cold crashing can be a challenge. My yeast fridge is too short to accommodate this behemoth, and my wife - though rather tolerant of the scatter of my brewing gear - might be moved to violence if I try to cram this thing into our normal refrigerator. Some people might employ a number of mason jars for this task, but that seems both expensive and complicated to me; therefore, I have drawn upon my redneck roots to present to you my high tech yeast starter decanting vessels.
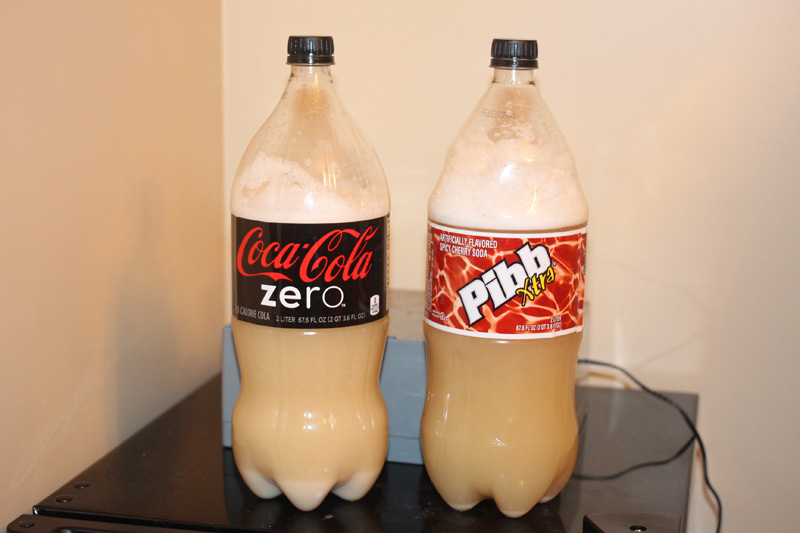
Behold, the glory of my bling.
After a day or two in the fridge, I have a nice, compact layer of yeast at the bottom of the soda bottle(s) in question. It's then pretty easy to decant the starter "wort" from on top of the yeast. You'll want to leave a a half inch to an inch or so of liquid on top of the yeast, which you will then swirl up to get all of the yeast into pourable suspension. Less than that, and you have chunky sludge that won't pour; more than that, and you make it harder on yourself to properly store your harvested portion. Don't be surprised if it takes you a few times to get a good feel for the process; the first time I did this with a poor flocculator (again, looking at you, Conan), I ended up with well over a dozen vials that I had to later combine, as they all contained very small amounts of yeast per vial once everything properly settled.
I leave my decanted soda bottle(s) out on the countertop throughout my brewday so as to allow the yeast to warm to pitching temperature. When the time arrives, I give the bottle(s) a nice swirl to get everything into homogeneous suspension.
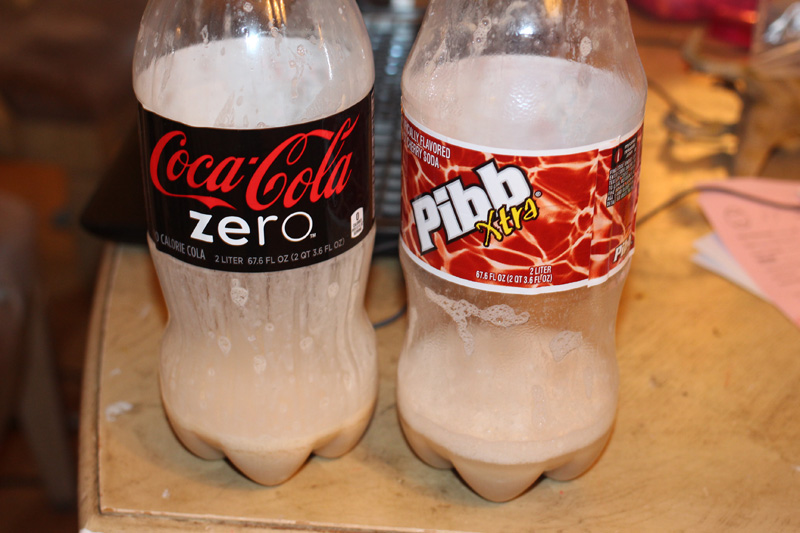
These babies are raring to go.
From here, I go ahead and fill one or more vials for storage. If the solution is pretty thick (as in the pictured example), one vial is plenty; if it isn't, you can expect to need to collect more total liquid. I use these soda bottle blanks as my vials for yeast storage - they work fantastic. They seal great, they are durable, and you can use them over and over.
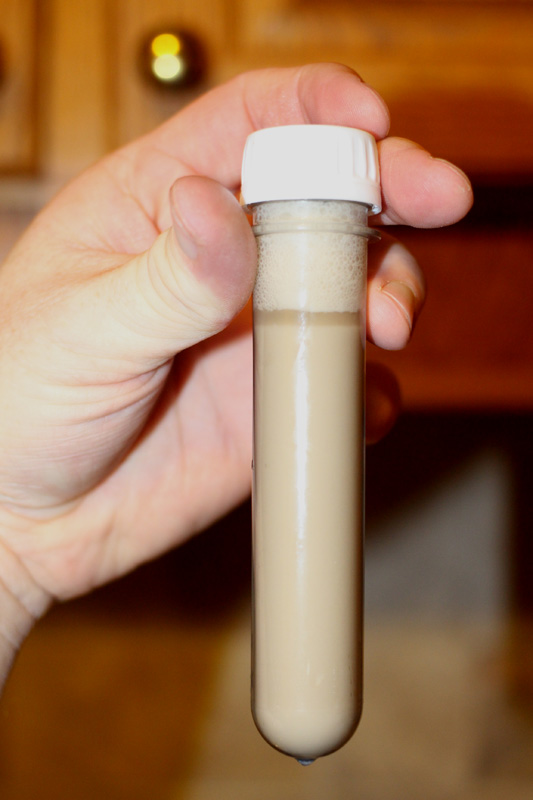
A very nice sample.
Once I am satisfied that I have collected enough yeast, I go ahead and pitch the remainder into my beer. Meanwhile, my collected vial(s) go into the fridge for another day or two. By then, the yeast will have compacted nicely, leaving behind a beautiful, pure sample of yeast that's ready to store for the next brewday. If necessary (and I feel like it), I'll decant and combine vials. Otherwise, I go ahead and label the completed vial with the number/name of the yeast strain, as well as the date of collection (which is used in future starter/viability calculations).
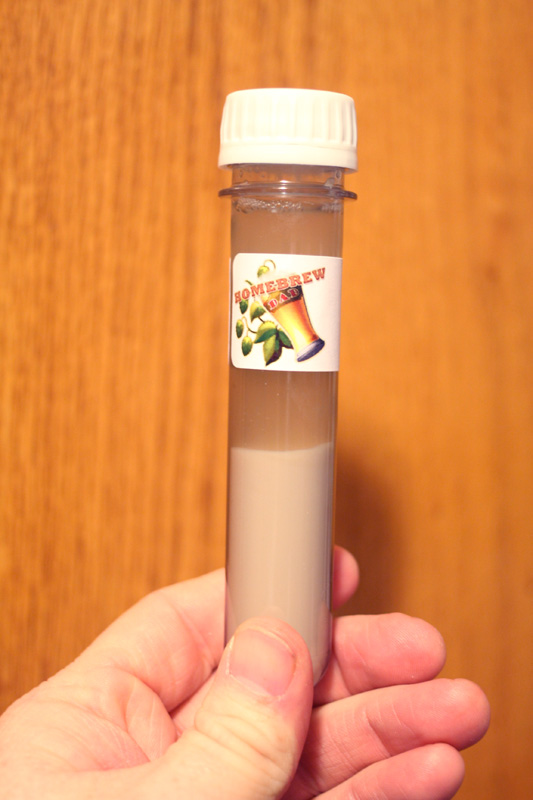
Ready for the next brewday... chilling in style.
Permalink
Tags for this post: yeast harvesting, yeast, harvest, starter, brew, brewing, homebrewing
11 Comments
how long do you typically keep these little vials around before using them up? I'm just trying to think if their viability would decrease any quicker than an actual smackpack would?
thanks!
posted by xpops on 2/13/2015 at 01:24:23 PM
If I don't brew within 4-6 months, I try to make a small starter to refresh the supply of yeast.
Otherwise, I treat them just like commercial yeast. I've successfully made a starter from nine month old harvested yeast; others have gone older than that. I see no reason why viability would be noticeably lower than commercial yeast.
posted by homebrewdad on 2/13/2015 at 01:32:36 PM
great - definitely something i'll be doing for future starters!
Have you tried harvesting from a starter that you made from one of these? Do you suppose it should only be done a few consecutive times, similar to rinsing yeast?
posted by xpops on 2/13/2015 at 03:10:40 PM
I have harvested and reused several times, xpops.
I'm not sure what the limit is. It likely depends on the yeast strain in question, and on how good your sanitation really is.
Since WLP037 wasn't even sold last year, I'm hoping that number is very large. :)
posted by homebrewdad on 2/13/2015 at 03:13:07 PM
haha, here's hoping, homebrewdad! good luck!
posted by xpops on 2/13/2015 at 03:16:32 PM
Hey HBD, the calculator says I need a two-step starter, but I'm unclear on what the intra-step process is. How do I go from one step to the next?
posted by AgedAardvark on 2/17/2015 at 11:51:42 AM
AgedArdvark - chill the starter once it's done, decant all of the liquid that you can. Leave the solid yeast in the flask, and add the next step's starter liquid.
posted by homebrewdad on 2/17/2015 at 11:58:34 AM
So, then if I know I'm pitching, say, 300b cells and saving 100b cells I'm just eyeballing it?
posted by AgedAardvark on 2/17/2015 at 03:56:53 PM
That's correct, you're eyeballing it. Realize that even the best calculators have a roughly +/- 15% margin of error to begin with.
Now, the calculator on the site will help you to figure out how much starter wort to save and how much to pitch - but that's assuming the yeast is in a homogeneous solution.
posted by homebrewdad on 2/17/2015 at 03:59:21 PM
"is in a homogeneous solution."
And you haven't decanted off the starter beer?
posted by AgedAardvark on 2/17/2015 at 05:51:45 PM
no doubt a great way to do it, but for me a little to complicated, time consuming, and you have to plan 3 days in advance. I reuse yeast but never use a yeast starter...haven't had a problem fermenting my beers yet. An alternate way to harvest yeast is to literally just dump the trub from the fermenter into a jar, put it in the fridge, and be done with it. On brewday, take it out and use it.
posted by One Pot Brewing on 4/10/2015 at 09:57:57 AM
One of the biggest hurdles to me getting involved in this aspect of homebrewing was the popular method of yeast harvesting that had been pushed for years - that method being yeast rinsing (commonly referred to online as "washing", though these are apparently not one and the same). I had googled various tutorials, and while the approaches had subtle differences, they all came back to the same basic steps - remove some portion of trub from the carboy, rinse that to hopefully yield more or less pure slurry, let it settle, make a complete WAG as to how much actual yeast that you had. It seemed like a lot of trouble, and I had a hard time buying into just how pure the yeast really was.
A little over a year ago, a free thinker from California started discussing an alternate, ridiculously simple method of yeast harvesting on the homebrewtalk forums. It caught some traction; he opened a blog of his own and posted his method there. He focused his blog on a similar theme - of looking at new methods, of examining old brewing preconceptions to see what was true and what was not. I can say without hyperbole that Brulosopher has revolutionized yeast harvesting, and done an incredible amount of good for home brewers in the previous year or so. If you have not yet read his initial post on yeast harvesting, by all means - go check it out now. I'll wait here until you return.
It took me longer than I care to admit to come around to adopting the mindset that harvesting yeast was more than just something that really advanced brewers would do. For better than a year, I simply treated a new package of yeast as a normal expense of brewing. Granted, I was smart enough to make starters - I had no desire to purchase 2-3 packages of yeast per brew to ensure that I could hit proper pitching rates - but I really didn't worry about it too much. What really tipped the scale for me was the desire to be able to brew with WLP037 (a platinum strain) outside of the season it was normally sold. Fortunately for me, my buddy vinpaysdoc was already ahead of me on harvesting yeast, and he was happy to share not only his yeast, but his knowledge.
These days, I harvest yeast every single time that I brew. I use the base Brulosophy method, tempered by my buddy's experiences, and seasoned a bit with my redneck heritage. I find this method so much better than yeast rinsing/washing for several reasons. The yeast is very pure (there are few byproducts from pure DME as opposed to the hopjunk and other crap you get from washing an actual beer's yeast cake), you get to store your yeast under "beer" (not water), and the process requires almost no extra effort. The following walks you through the typical yeast harvesting steps that I follow.
Before I do anything else, I first determine how many yeast cells I will need for my upcoming brew. Naturally, I use the yeast starter calculator here on this site for that, making sure to populate the "overbuild cell count" option with 100 billion cells (aka roughly the amount that comes in a typical vial or smack pack of commercial yeast). I always use a target gravity of 1.037 for my starters, which research has shown to be the "sweet spot" for yeast growth. Also, it doesn't hurt that the formula for such a starter is stupid simple - 100 grams of dry malt extract per liter of water yields a gravity of 1.037.
Incidentally, the scale that I use has proven to be very accurate and reliable for this - and it's quite affordable, too.

Pretty simple.
As an aside, I do use yeast nutrient in all of my starters. While this may not be strictly necessary, it's a good idea.
I almost always let my starters run for a good 2-3 days before I consider them to be complete. Realize that if your yeast is a little long in the tooth (say, it's been a few months since it's been used, or you have an older vial), you may need to give it an extra day to really get going. Some people prefer to pitch starters at high krausen, and have had great luck with that; more power to them. My method takes more lead time, but I feel that it makes yeast harvesting easier to do (which is the entire point of this post, yes?).
Note that not every yeast strain will make a large krausen (or any krausen at all) - but pretty much any strain will end up with a starter that looks cloudy due to the suspended yeast.

The krausen has fallen, the liquid is milky - this one is pretty much done.
At this point, I cold crash my starters for a minimum of 12 hours or so (for highly flocculent yeasts); ideally, it's more like 24-28 hours. Some really annoying strains (I'm looking at you, Conan) can cold crash for days and still not fully flocc out; keep this in mind. Regardless, the longer you cold crash, the more compact the yeast cake will be, and the easier it will be to decant without losing precious yeast.
I love my massive 5 liter erlenmeyer flask for making starters; neither high gravity beers nor lagers give me any trouble in terms of starter volume... but cold crashing can be a challenge. My yeast fridge is too short to accommodate this behemoth, and my wife - though rather tolerant of the scatter of my brewing gear - might be moved to violence if I try to cram this thing into our normal refrigerator. Some people might employ a number of mason jars for this task, but that seems both expensive and complicated to me; therefore, I have drawn upon my redneck roots to present to you my high tech yeast starter decanting vessels.

Behold, the glory of my bling.
After a day or two in the fridge, I have a nice, compact layer of yeast at the bottom of the soda bottle(s) in question. It's then pretty easy to decant the starter "wort" from on top of the yeast. You'll want to leave a a half inch to an inch or so of liquid on top of the yeast, which you will then swirl up to get all of the yeast into pourable suspension. Less than that, and you have chunky sludge that won't pour; more than that, and you make it harder on yourself to properly store your harvested portion. Don't be surprised if it takes you a few times to get a good feel for the process; the first time I did this with a poor flocculator (again, looking at you, Conan), I ended up with well over a dozen vials that I had to later combine, as they all contained very small amounts of yeast per vial once everything properly settled.
I leave my decanted soda bottle(s) out on the countertop throughout my brewday so as to allow the yeast to warm to pitching temperature. When the time arrives, I give the bottle(s) a nice swirl to get everything into homogeneous suspension.

These babies are raring to go.
From here, I go ahead and fill one or more vials for storage. If the solution is pretty thick (as in the pictured example), one vial is plenty; if it isn't, you can expect to need to collect more total liquid. I use these soda bottle blanks as my vials for yeast storage - they work fantastic. They seal great, they are durable, and you can use them over and over.

A very nice sample.
Once I am satisfied that I have collected enough yeast, I go ahead and pitch the remainder into my beer. Meanwhile, my collected vial(s) go into the fridge for another day or two. By then, the yeast will have compacted nicely, leaving behind a beautiful, pure sample of yeast that's ready to store for the next brewday. If necessary (and I feel like it), I'll decant and combine vials. Otherwise, I go ahead and label the completed vial with the number/name of the yeast strain, as well as the date of collection (which is used in future starter/viability calculations).

Ready for the next brewday... chilling in style.
Permalink
Tags for this post: yeast harvesting, yeast, harvest, starter, brew, brewing, homebrewing


Please support BrewUnited by using our Amazon affiliate link when doing any shopping there - be it for homebrewing or for your regular shopping!
11 Comments
how long do you typically keep these little vials around before using them up? I'm just trying to think if their viability would decrease any quicker than an actual smackpack would?
thanks!
posted by xpops on 2/13/2015 at 01:24:23 PM
If I don't brew within 4-6 months, I try to make a small starter to refresh the supply of yeast.
Otherwise, I treat them just like commercial yeast. I've successfully made a starter from nine month old harvested yeast; others have gone older than that. I see no reason why viability would be noticeably lower than commercial yeast.
posted by homebrewdad on 2/13/2015 at 01:32:36 PM
great - definitely something i'll be doing for future starters!
Have you tried harvesting from a starter that you made from one of these? Do you suppose it should only be done a few consecutive times, similar to rinsing yeast?
posted by xpops on 2/13/2015 at 03:10:40 PM
I have harvested and reused several times, xpops.
I'm not sure what the limit is. It likely depends on the yeast strain in question, and on how good your sanitation really is.
Since WLP037 wasn't even sold last year, I'm hoping that number is very large. :)
posted by homebrewdad on 2/13/2015 at 03:13:07 PM
haha, here's hoping, homebrewdad! good luck!
posted by xpops on 2/13/2015 at 03:16:32 PM
Hey HBD, the calculator says I need a two-step starter, but I'm unclear on what the intra-step process is. How do I go from one step to the next?
posted by AgedAardvark on 2/17/2015 at 11:51:42 AM
AgedArdvark - chill the starter once it's done, decant all of the liquid that you can. Leave the solid yeast in the flask, and add the next step's starter liquid.
posted by homebrewdad on 2/17/2015 at 11:58:34 AM
So, then if I know I'm pitching, say, 300b cells and saving 100b cells I'm just eyeballing it?
posted by AgedAardvark on 2/17/2015 at 03:56:53 PM
That's correct, you're eyeballing it. Realize that even the best calculators have a roughly +/- 15% margin of error to begin with.
Now, the calculator on the site will help you to figure out how much starter wort to save and how much to pitch - but that's assuming the yeast is in a homogeneous solution.
posted by homebrewdad on 2/17/2015 at 03:59:21 PM
"is in a homogeneous solution."
And you haven't decanted off the starter beer?
posted by AgedAardvark on 2/17/2015 at 05:51:45 PM
no doubt a great way to do it, but for me a little to complicated, time consuming, and you have to plan 3 days in advance. I reuse yeast but never use a yeast starter...haven't had a problem fermenting my beers yet. An alternate way to harvest yeast is to literally just dump the trub from the fermenter into a jar, put it in the fridge, and be done with it. On brewday, take it out and use it.
posted by One Pot Brewing on 4/10/2015 at 09:57:57 AM

