Adventures in Stirplate Construction
For a year and a half, I've been a low tech, shaken starter kind of guy. I'd sanitize a gallon sweet tea jug and use it to great effect.
However, I recently inherited a mini fridge, and have decided to try my hand at lagers. Since I would need so much larger starters for them, I put a DIY stirplate on my project list.
No problem, I thought. I've recently built an STC-1000 temperature controller box, and it was a cinch. Surely I was capable of a silly stirplate?
Ah, pride goeth before a fall. Or three.
First off, it took me forever to figure out how to extract the magnets from a hard drive. Sure, I took the drive apart easily enough (though it did cost me some blood as I somehow sliced my knuckle open on some internal piece), but I couldn't get the darned magnets themselves off of the brackets. I finally managed by holding the bracket with pliers, then forcing a very tiny flathead screwdriver under the edge of the magnet and popping it up. I won't embarrass myself further in stating exactly how long it took me to figure this out.
Next, I had a complete brain freeze. I decided to test my fan by wiring it up... to a normal computer cord I had scavenged. To add insult to injury, I hooked it up backwards, as well. Shockingly (please excuse the pun), my poor 12 volt fan did not respond well to 110 volts of current from my wall. One visually impressive electrical arc (complete with the delicious smell of ozone) later, my fan was dead. Pro tip: on a computer fan, red is hot, black is neutral. From your power cord, wire up your white stripe to red, your black to black.
I obtained a new fan, as well as an appropriate 12 volt power supply cord from a dead wireless router, and tried again. This time, I managed to get the fan to spin just fine (and this one came with cool LED lights, not that I would be able to see them inside of the box once it was all assembled), but I learned that even though the magnets would stick directly to the center of the fan, they would also stop the fan from spinning.
Meh, no problem. I glued a large washer onto the fan, then stuck the magnets to that washer. Problem solved; the fan spun with no issues. It was time to mount it in the project box.
A grinning Murphy was waiting for me as I discovered that the bolts I owned were long enough to mount the fan, but too short to space it enough to allow for it to spin with the magnets attached. Rats.
I obtained some longer bolts, then tried again.
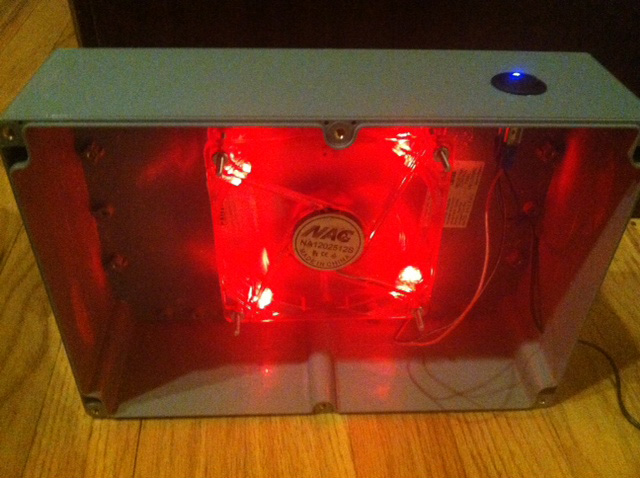 This time it worked, so I drilled a hole in the box to allow my power cord entrance, mounted the fan, then cut a hole for my rocker switch. Sure, I *could* have just wired the fan up directly, but I wanted to be able to turn it on and off... and my switch had the cool bling factor of a blue LED.
Of course, that led to problems of its own - as it turns out, my blue LED stays lit no matter if the fan is turned on or off. I was thinking that this was a defect in the switch, since the fan is properly operated by the switch, but further reading suggests that my hot terminals may be backwards. After my current starter is done, I may open the box back up and swap the leads to see if that fixes the issue.
Either way, though, I was finally ready to test. I went ahead and boiled some DME (and enjoyed my first boilover in an Erlenmeyer flask), then cooled and pitched my yeast.
Experienced stirplate builders know where this is going - no matter what I did, the stir bar would get thrown almost instantly. It was clear that my fan was simply too fast. So, I headed to Radio Shack, bought myself a $5 rheostat/pentiometer, then hooked it up.
Still no joy. The fan will only go so slow, then it simply cuts off. So I decided to add magnets to make the thing stronger.
Busted open another hard drive, extracted the magnet from it (this one only had one magnet). Stacked this smaller magnet on with my other two, put it back together... fan was now rubbing again, took it apart, added more spacer nuts, reassembled.
Still didn't work.
Took the whole thing apart yet again. Removed all of the magnets, then stacked my two bigger original magnets, instead of placing them side by side. Had to add another spacer. Frustration was at an all time high - this was my fourth day to look at this stupid stirplate.
Finally, I had success. It takes a fair amount of tinkering, repositioning, failure, more repositioning, holding my mouth juuuust right... but finally, it stirs.
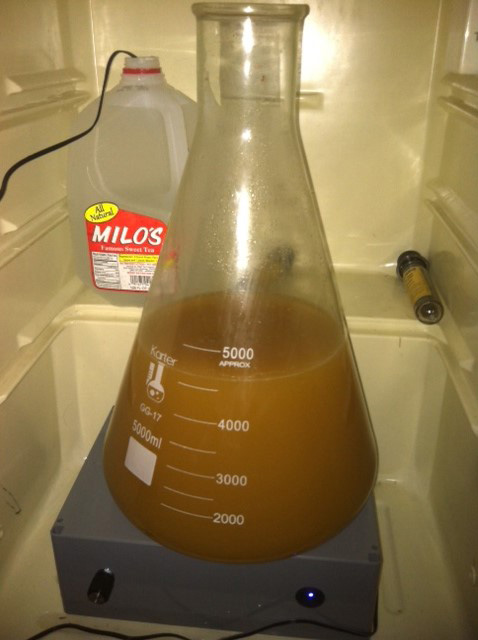 I still can't get one of those super cool vortexes, but I am well aware that a simple dimple is enough. I can see the swirl, and it's obvious that I have a ton of yeast in solution - there is virtually no sediment at all in a 4.5 liter starter. Hopefully, I will end up with tons of yeast.
When this batch is done, I'll look at the switch one more time. I may also replace my inch and a half stirbar with a one inch version, and I may play with magnet placement a bit more... but it works, so I'm finally happy.
Edit - as a followup to the above post, I thought I'd share that I bought an el cheapo one inch stir bar from my LHBS (I may have possibly pitched the other stir bar into my beer along with that initial starter). This one doesn't even have the raised ring ont he middle that I hear is so helpful. Guess what? The silly thing spins great, never gets thrown. I don't get a pretty vortex, but it does the job nicely.
Permalink
Tags for this post: stir, plate, stirplate, DIY, yeast, starter, homebrewing, beer


Please support BrewUnited by using our Amazon affiliate link when doing any shopping there - be it for homebrewing or for your regular shopping!
2 Comments
Wow. Good for you. I think this is beyond my capabilities. But it's a great read. And welcome to the lager world. I've got an imperial pilsner sitting in my chamber right now. Its been at 28 degrees for 6 weeks so far. Came out at 9.1% and tastes damn good. Love the clarity of pilsners and lagers.
keep us up to date my friend. Cheers
posted by Jimmy on 10/01/2013 at 09:27:51 AM
I just had nearly the same experience, except I started with the LHBS little smooth stir bar and chose to buy radio shack rare earth magnets that were far too small. Bought better magnets and it worked great after the washer and major tinkering(Vortex to bottom that will throw bubbles)...until I got the 5L flask It was too thick, so I got a rare earth stir bar and bigger RE mags for the fan and it is so strong it will stop the fan if you just put it on the box. Also just brewed a nice Oatmeal, no toffee but I toast my oats too! Stumbled here for your calorie calculator...thanks!_
posted by Mark on 1/13/2014 at 11:25:12 PM